
cryptostorm now has a feature that allows you to make your VPN traffic look like SSH traffic. This is mainly to help people who are behind restrictive firewalls that only allow SSH traffic, but it can also be useful against certain correlation attacks.
Normally, if a network administrator wanted to block everything but SSH, they would simply block everything but TCP port 22 (SSH). If you're behind a firewall that's only doing that, you can just tell the VPN to connect to TCP port 22 to get past it. But because DPI-capable firewalls are getting cheaper, you might be behind a firewall that's doing packet inspection to see if that traffic on port 22 is really SSH. If that's the case, then this new feature will allow you to bypass that firewall.
Thanks to our port striping feature, this new SSH feature can also be used on any port from 1-65535 (excluding 5061 and 5062 and 5063). So if the network you're on is doing DPI to detect SSH, but it's only allowing SSH on port 2222, you can still use this to bypass that firewall. Also, this feature uses the same hosts/IPs as the VPN, so those of you doing your own custom IP-based kill switch won't have to change anything.
Windows instructions
Widget users
As of v3.46, our widget has built-in SSH and HTTPS tunneling support. Click the "Options" button then the "Advanced" tab, it's at the bottom. Just select the host to tunnel through then connect like normal.
OpenVPN GUI users
The first thing you should do is download PuTTY from:
https://www.chiark.greenend.org.uk/~sgtatham/putty/latest.html
If you've already got PuTTY installed, make sure you're using at least version 0.68 since that's when they added 25519 support. Actually, 0.68 has several security vulnerabilities, so you should just upgrade to the latest version.
Start up PuTTY and you'll see the main screen:
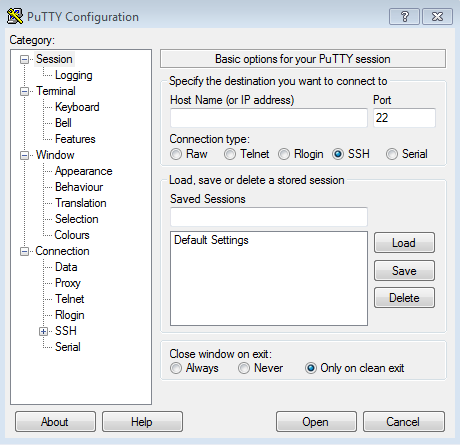
Under "Host Name (or IP address)", type in any of the host names from this list
(they're the same as the VPN host names).
If needed, you can change the port to anything from 1 to 65535 (excluding 5061 and 5062 and 5063).
But if you don't need that then just leave it at 22.
In this example, we'll use vegas.cstorm.is and port 22.
Next, click on the "Connection" category to the left, then click "SSH".
On that screen, click the checkbox that says "Don't start a shell or command at all":
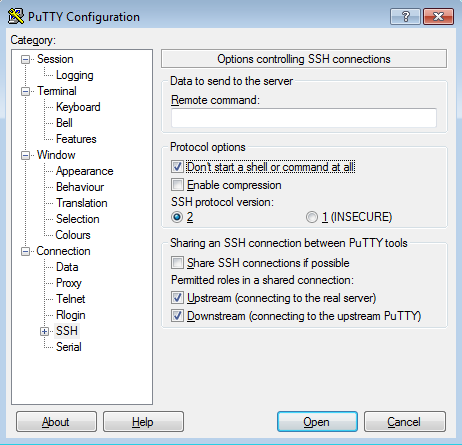
After that, click the + symbol next to the "SSH" category to expand that section.
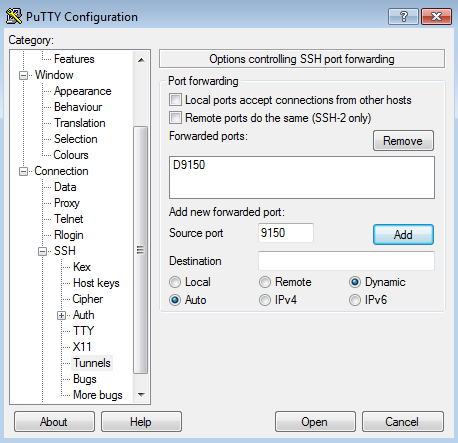
Under "SSH", click on "Tunnels".
On that screen, enter 9150 for the "Source port", then select the "Dynamic" option.
Everything else should be left as is.
Next click the "Add" button, and it should add "D9150" under the "Forwarded ports" section:
If you'd like to save the above settings, go back to the "Session" category at the top of the list on the left, then under "Saved Sessions" give it a name like "vegas SSH 9150" or whatever helps you remember which host/port this is.
Otherwise, click the "Open" button at the bottom-right to connect.
If this is your first time connecting, you'll see the security prompt:
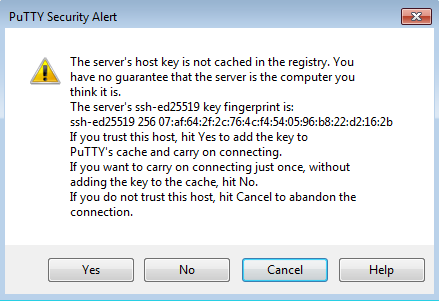
Click "Yes" to save the server's host key to the registry so you won't be prompted for that anymore, or if for some reason you don't want to save the key (you're on work/school computer, etc.) click "No" to connect without saving the key.
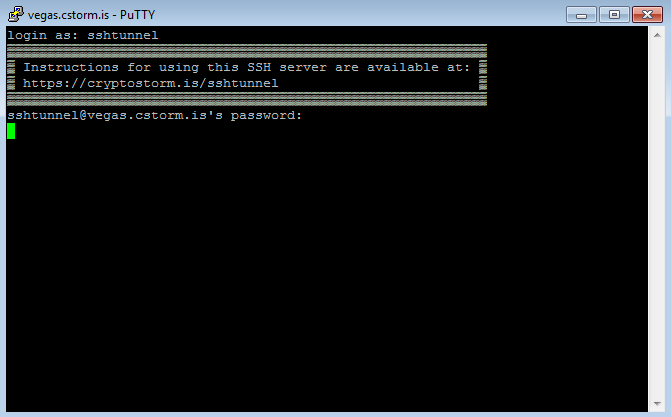
In the black login screen you'll see a username prompt that says "login as: "
Type in the username: sshtunnel
Then press enter. Next it'll ask you for a password, which is the same as the username, so type in sshtunnel again and press enter.
When you type in the username it'll be repeated back to you, but when you type in the password it won't do that.
At this screen, it'll appear to just be sitting there doing nothing, but the tunnel is actually open now.
To have OpenVPN GUI use this SSH tunnel, make sure you're using one of our TCP configs from https://cryptostorm.is/configs/ and add to the config the line:
socks-proxy 127.0.0.1 9150
That's it! Connect with OpenVPN GUI like you normally would, being sure to specify the config you just changed.
If you start up Wireshark or any other packet sniffer, you'll see that all of your traffic appears to be SSH: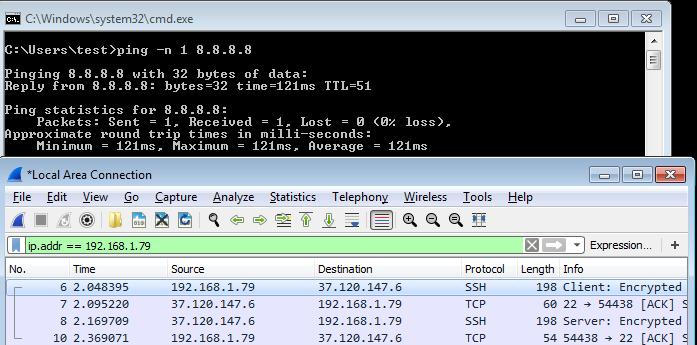
Linux instructions
Most modern Linux distributions include the OpenSSH client, but if your system doesn't have the `ssh` command, then install it using whatever package manage your system has.
To start the SSH tunnel, run the command:
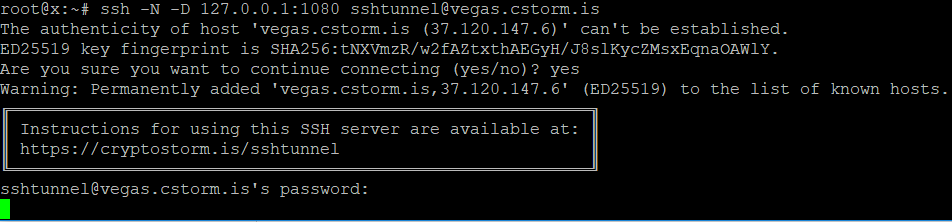
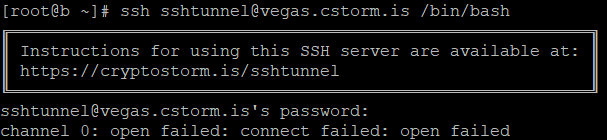
ssh -N -D 127.0.0.1:1080 sshtunnel@vegas.cstorm.is
If you want to use something other than the vegas server, the full list of nodes is available here.
If this is your first time connecting, you'll get asked about the host key and if you want to continue connecting.
Type yes then press enter to continue.
On the next screen you'll be asked for the password, which is the same as the username, so enter sshtunnel and press enter.
At this screen it'll appear to be just sitting there, but the tunnel is actually open now.
Be sure to leave this terminal window open, if you close it or exit out of ssh with CTRL+C, the SSH tunnel will close (which will also disconnect you from the VPN).
Next step is to use one of our TCP configs from https://cryptostorm.is/configs/ and add to it the lines:
socks-proxy 127.0.0.1 1080
route vegas.cstorm.is 255.255.255.255 net_gateway
Replace the "vegas.cstorm.is" part with whichever SSH server you chose from https://cryptostorm.nu/nodes.txt.
For reasons we're not quite sure of, that route line is only needed on Linux. In Windows it appears to work fine without it.
Anyways, after you've started ssh and added the above two lines, connect with OpenVPN like you normally would, specifying the config you just modified. It will probably work with GUI programs (NetworkManager, etc.), but those types of programs are known to ignore some config options, so it might not. Best thing to do is connect directly at the terminal.
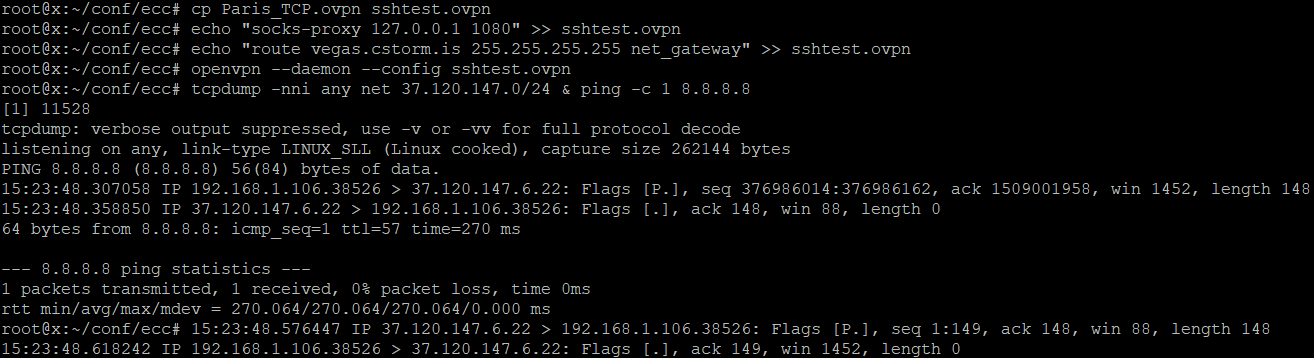
Once you're connected, all of your traffic will now appear to be SSH traffic. You can use `tcpdump` to verify:
Technical details
I'm sure some of you will be questioning whether it's a good idea to use such a simple username/password for this SSH setup. Much like our OpenVPN setup, the username/password has nothing to do with the encryption used by the tunnel.
It's only used for authentication. We decided that this simple method would be better than tying SSH users to the tokens the VPN uses because this way ensures that we can't track users even if we wanted to.
The OpenSSH server that powers the above tunnel setup is also separate from the one we use to login to the servers when we need to do administrative tasks. This ensures that any potential vulnerabilities in OpenSSH can't compromise the server. The OpenSSH server's config is also extremely restrictive, which is why that "Don't start a shell or command at all" (or -N on Linux) step is necessary. Here's the server's sshd_config:
Port 2222
ListenAddress 127.0.0.1
Banner /etc/ssh/banner.txt
AddressFamily inet
AllowAgentForwarding no
AllowUsers sshtunnel
AllowStreamLocalForwarding no
Protocol 2
Compression no
MaxSessions 0
PermitTTY no
HostKey /etc/ssh/tunnel_host_key
HostKey /etc/ssh/tunnel_host_rsa_key
KexAlgorithms curve25519-sha256@libssh.org,ecdh-sha2-nistp521,ecdh-sha2-nistp384,ecdh-sha2-nistp256,diffie-hellman-group-exchange-sha256
Ciphers chacha20-poly1305@openssh.com,aes256-gcm@openssh.com,aes128-gcm@openssh.com,aes256-ctr,aes192-ctr,aes128-ctr
MACs hmac-sha2-512-etm@openssh.com,hmac-sha2-256-etm@openssh.com,umac-128-etm@openssh.com,hmac-sha2-512,hmac-sha2-256,umac-128@openssh.com
PasswordAuthentication yes
ChallengeResponseAuthentication no
X11Forwarding no
PermitTunnel yes
PermitRootLogin no
PermitUserEnvironment no
PermitUserRC no
AllowTcpForwarding local
GatewayPorts no
PermitOpen balancer.cstorm.is:* balancer.cstorm.net:* balancer.cryptostorm.pw:* moldova.cstorm.is:* moldova.cstorm.net:* moldova.cryptostorm.pw:* sk.cstorm.is:* sk.cstorm.net:* sk.cryptostorm.pw:* sweden.cstorm.is:* sweden.cstorm.net:* sweden.cryptostorm.pw:* switzerland.cstorm.is:* switzerland.cstorm.net:* switzerland.cryptostorm.pw:* netherlands.cstorm.is:* netherlands.cstorm.net:* netherlands.cryptostorm.pw:* romania.cstorm.is:* romania.cstorm.net:* romania.cryptostorm.pw:* frankfurt.cstorm.is:* frankfurt.cstorm.net:* frankfurt.cryptostorm.pw:* dusseldorf.cstorm.is:* dusseldorf.cstorm.net:* dusseldorf.cryptostorm.pw:* england.cstorm.is:* england.cstorm.net:* england.cryptostorm.pw:* lisbon.cstorm.is:* lisbon.cstorm.net:* lisbon.cryptostorm.pw:* finland.cstorm.is:* finland.cstorm.net:* finland.cryptostorm.pw:* poland.cstorm.is:* poland.cstorm.net:* poland.cryptostorm.pw:* latvia.cstorm.is:* latvia.cstorm.net:* latvia.cryptostorm.pw:* denmark.cstorm.is:* denmark.cstorm.net:* denmark.cryptostorm.pw:* rome.cstorm.is:* rome.cstorm.net:* rome.cryptostorm.pw:* paris.cstorm.is:* paris.cstorm.net:* paris.cryptostorm.pw:* vancouver.cstorm.is:* vancouver.cstorm.net:* vancouver.cryptostorm.pw:* montreal.cstorm.is:* montreal.cstorm.net:* montreal.cryptostorm.pw:* newyork.cstorm.is:* newyork.cstorm.net:* newyork.cryptostorm.pw:* chicago.cstorm.is:* chicago.cstorm.net:* chicago.cryptostorm.pw:* atlanta.cstorm.is:* atlanta.cstorm.net:* atlanta.cryptostorm.pw:* vegas.cstorm.is:* vegas.cstorm.net:* vegas.cryptostorm.pw:* seattle.cstorm.is:* seattle.cstorm.net:* seattle.cryptostorm.pw:* la.cstorm.is:* la.cstorm.net:* la.cryptostorm.pw:* dallas.cstorm.is:* dallas.cstorm.net:* dallas.cryptostorm.pw:* nc.cstorm.is:* nc.cstorm.net:* nc.cryptostorm.pw:* florida.cstorm.is:* florida.cstorm.net:* florida.cryptostorm.pw:* oregon.cstorm.is:* oregon.cstorm.net:* oregon.cryptostorm.pw:* maine.cstorm.is:* maine.cstorm.net:* maine.cryptostorm.pw:* dc.cstorm.is:* dc.cstorm.net:* dc.cryptostorm.pw:*
ClientAliveInterval 10
ClientAliveCountMax 20
As you can see, the only thing you can connect to is the VPN hosts. I know, it's weird having all of those hosts on the same line, but if you have multiple PermitOpen lines, OpenSSH would only use the first one (or the last, I forget). So they all need to go on one line.
All of the other options are to ensure that this server can only be used to tunnel to the hosts specified, and nothing else. The 'sshtunnel' user has it's shell set to /bin/false, and thanks to all of the other options, it's not possible to get a shell with that user and this SSH server setup.
If you were to try this old trick, it would fail:
It would also fail if you tried to connect to anything other than the permitted hosts, including localhost.
The initial connection is actually made to haproxy, which acts as a frontend balancer for this whole thing (and it's also used to balance our TCP OpenVPN instances). haproxy detects whether the session is RSA OpenVPN, ECC OpenVPN, or SSH, and forwards it to it's respective backend. That's why the above sshd_config uses 127.0.0.1:2222, haproxy will forward to it if the connection is SSH. Another benefit of this setup is that it's impossible for us to know a user's real IP if they use this SSH tunnel or if they connect to the TCP OpenVPN instances. haproxy does support something called the PROXY protocol that can be used to relay a client's IP, but it appears that both OpenVPN and OpenSSH don't support that protocol. So even if we turned on verbose logging for both OpenVPN and OpenSSH, all client IPs would appear to be the haproxy instance's public IP.
Those last two ClientAliveInterval and ClientAliveCountMax lines act as a sort of "keepalive" to ensure that the tunnel stays up, even if there's no traffic going through it. If you're getting disconnected from the tunnel, you might need to add those two lines to your own local /etc/ssh/ssh_config configuration file. It didn't appear to be needed in our tests though.
Curve25519 is used for the host key algorithm (which is a different host key from the one the admin sshd uses).
Curve25519 support was added to OpenSSH version 6.5/6.5p1 (on 2014-01-30), so if you're using an older OpenSSH, you should really upgrade. For those of you running this SSH tunnel on a router where you might not be able to upgrade SSH, the RSA algorithm is also supported.
As mentioned in the first paragraph, this SSH tunneling setup can also be useful in preventing correlation attacks.
You could use https://cryptostorm.is/multihop and/or Tor (or another VPN), but that would be slow.
With this SSH setup, your traffic would appear to be SSH going to whichever server you choose.
The VPN traffic can then go to a different server, so the packets leaving your network aren't the same IP as the IP the internet sees you as having.
What's next?
We'll start working on doing the same as above, but for HTTPS instead of SSH. We're still testing out other protocols, but unfortunately most obfuscation/tunneling software for other protocols is "Proof of Concept" code only, which usually means insecure/unstable. Once we're done testing and adding other protocols, we'll add obfs4 support to all the servers, which should help those out behind the GFW.
Update
It occurred to me that if someone were to find the administrative SSH server (which are on separate, unpublished IPs on randomized ports), they could use the above 'sshtunnel' user/pass to login and bypass the PermitOpen restrictions, basically giving them a free SSH proxy. So we've added to those admin sshd's the config entry: DenyUsers sshtunnel
Our widget now includes built-in SSH and HTTPS tunneling support, so changing the above widget instructions to reflect that.