
OpenVPN
1. Download configs
Go to cryptostorm.is/configs/ or our GitHub and download one of our OpenVPN configs.
If you don't know which config to use (RSA, ECC, Ed25519, or Ed448), and you're running a recent OpenWrt, just use the ECC UDP ones. The TCP configs should only be used if UDP OpenVPN is blocked by your ISP/firewall.
If you're using an ancient version of OpenWrt that still has a 2.3.x version of OpenVPN, the only configs that'll work are the RSA ones (and you should really upgrade your OpenWrt).
So skip the Balancer configs.
2. Install OpenVPN
Login to LuCI (the web interface on your router), which by default is at http://192.168.1.1/
Navigate to System → Software then click on Update lists...
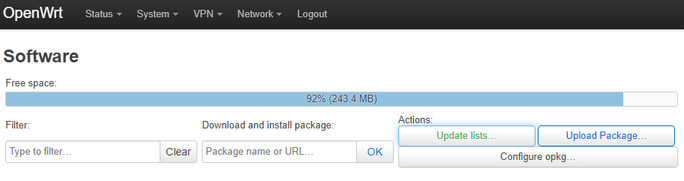
Under Download and install package, type in luci-app-openvpn then click the OK button, then the Install button on the confirmation window, then do the same for openvpn-openssl
3. Configure OpenVPN
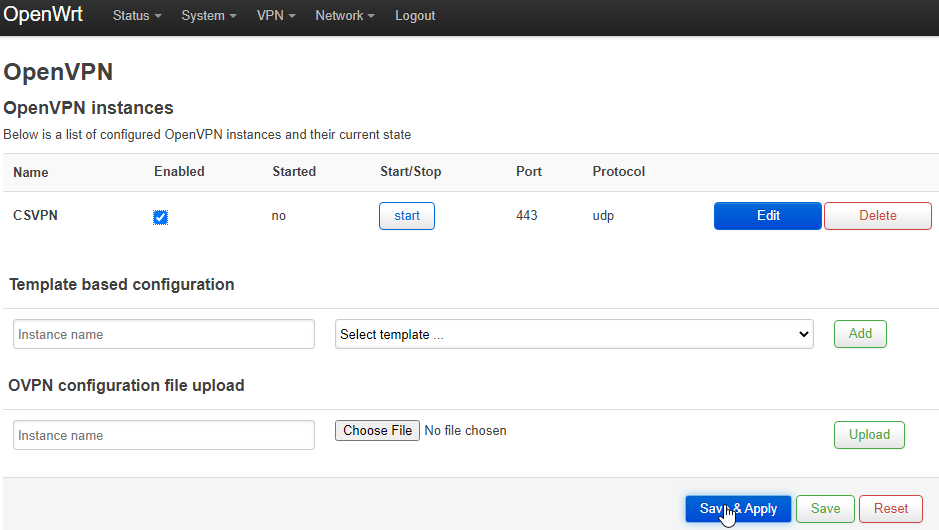
Navigate to VPN → OpenVPN. If you don't see a VPN menu, refresh. Your browser might have cached the page before luci-app-openvpn was installed.
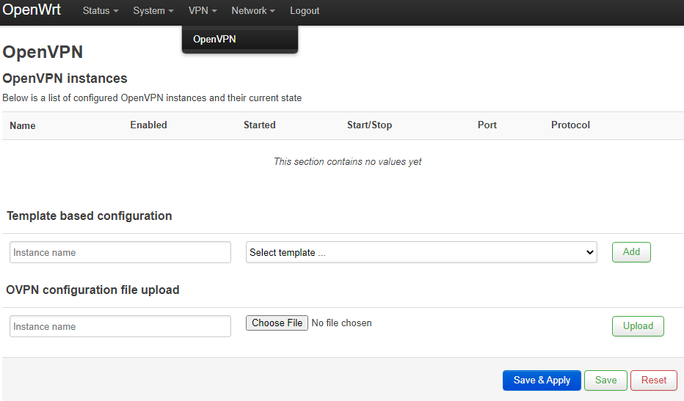
Under OVPN configuration file upload, enter CSVPN for Instance name, or anything else that helps you remember that this is the config for cryptostorm.
Click the Choose File button and select the config you downloaded in step 1, then click the Upload button.
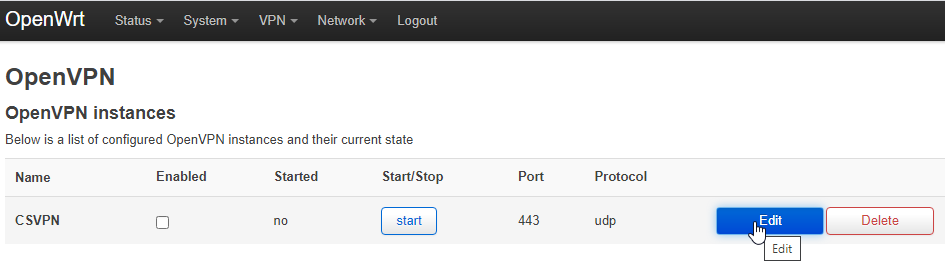
On the next page, click the Edit button:
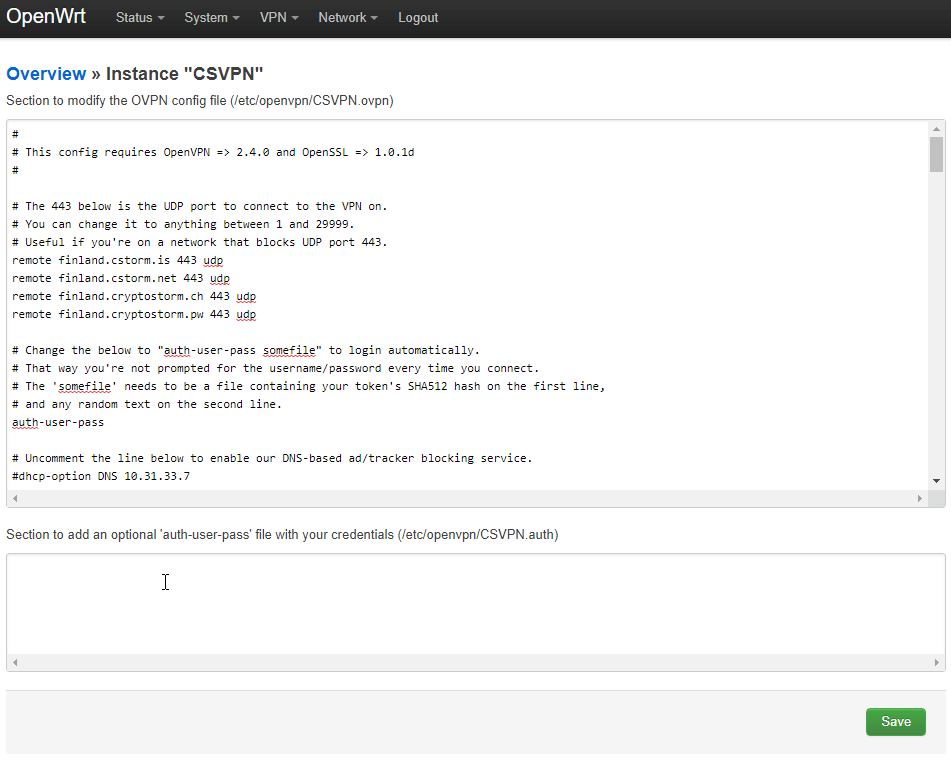
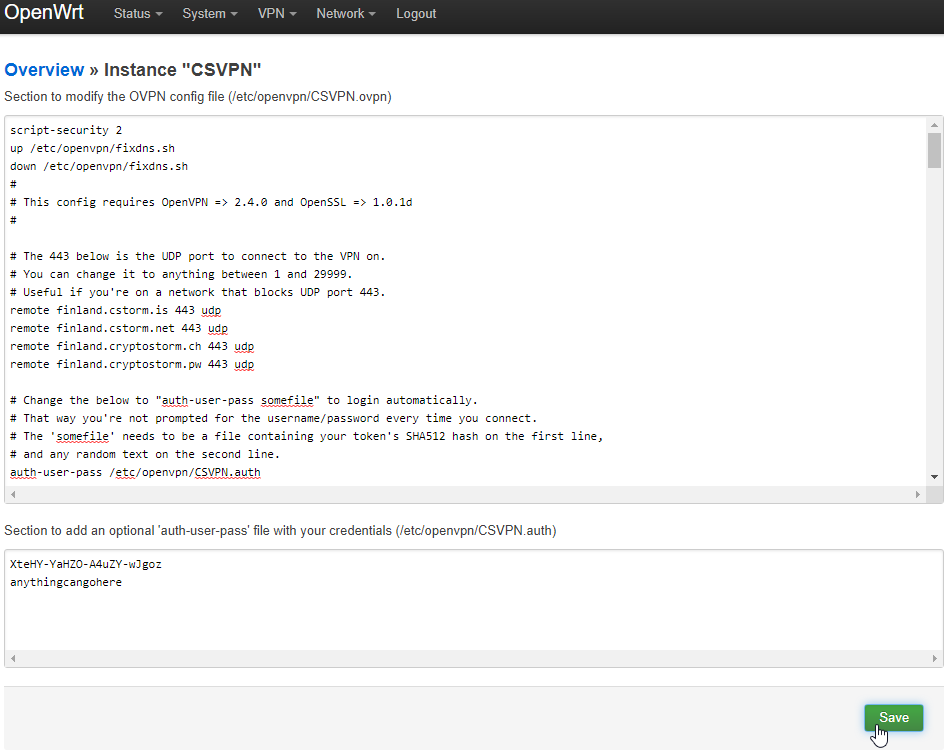
On the next page, paste your cryptostorm access token into the bottom section, and on a second line type in any text.
Next, copy the full path and filename of the .auth file shown inside parenthesis, to the right of the text with your credentials
If you're using the instance name CSVPN, then the path/filename should be /etc/openvpn/CSVPN.auth
In the section at the top, find the line that starts with auth-user-pass, put a space after that, then paste in that full .auth path/filename you just copied.
Then click the Save button:
Next, navigate to VPN → OpenVPN again. Click the checkbox under Enabled, then click the Save & Apply button at the bottom.
4. Configure interface
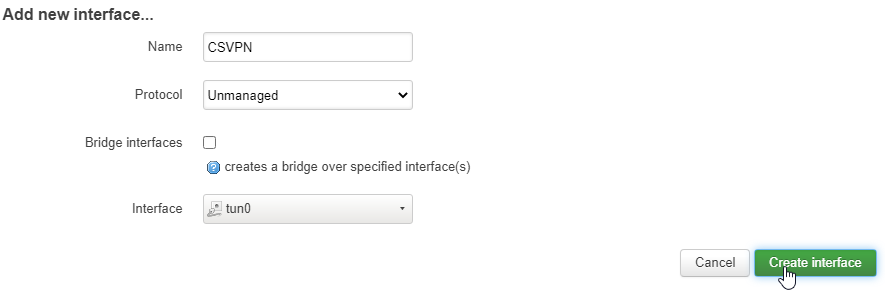
Navigate to Networking → Interfaces, then click the Add new interface button.
Type CSVPN into the Name field, then select Unmanaged for the Protocol
In the Interface field, select -- custom -- then type in tun0 then press enter, then click the Create interface button.
On the next window, under the General Settings tab, make sure Bring up on boot is selected (if you want your router to connect to the VPN when it boots up).
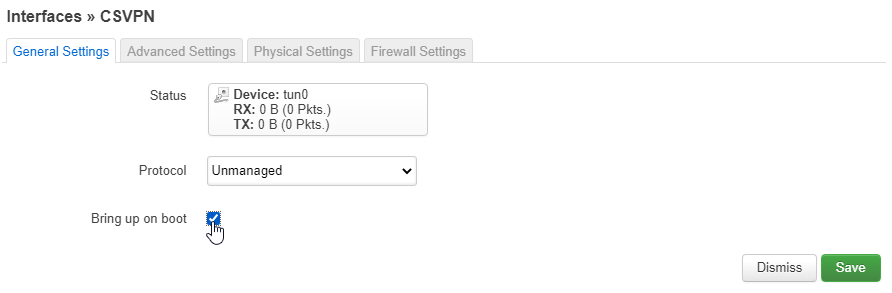
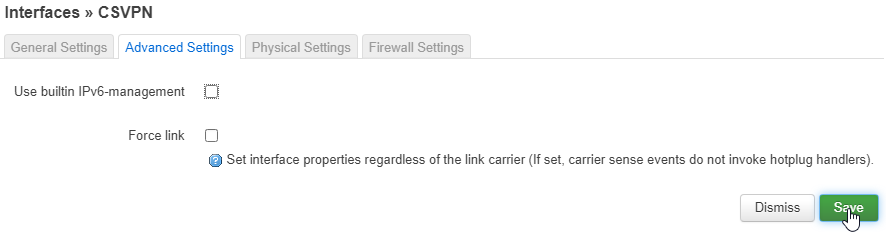
Under the Advanced Settings tab, make sure that Use builtin IPv6-management is NOT selected.
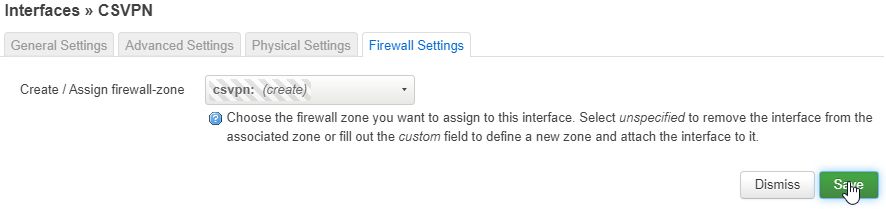
Under the Firewall Settings tab, for the Create/Assign firewall-zone field, click unspecified then type in csvpn then press enter.
Click the Save button, then back on the Interfaces page click the Save & Apply button
5. Configure firewall
Navigate to Networking → Firewall. In the list of Zones near the bottom, click the Edit button for the csvpn entry.
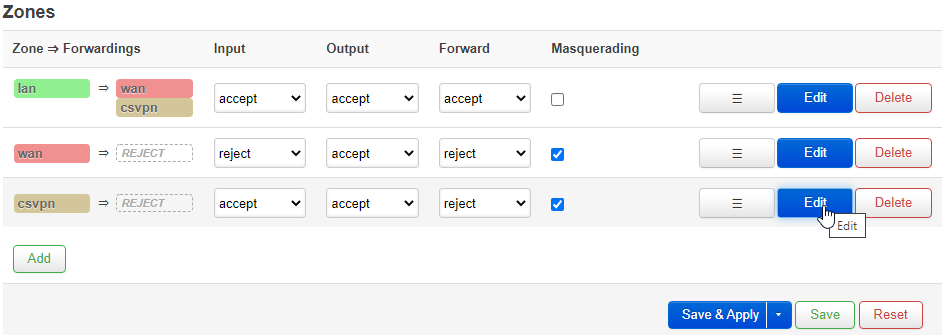
Input should be set to reject, Output to accept, Forward to reject.
Masquerading should be enabled, and so should MSS Clamping.
Covered networks should be set to CSVPN, and Allow forward from source zones should be set to LAN.

Next, click the Save button to save these firewall settings.
6. Configure DNS
OpenWrt will ignore the DNS settings a VPN server pushes, so some scripting is needed.
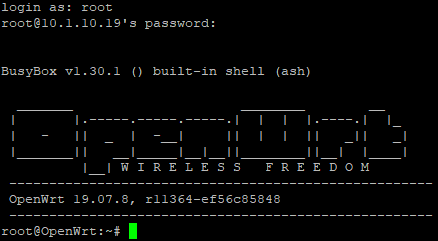
First, connect to the SSH server OpenWrt is running. If you've disabled it, go to System → Administration → SSH Access and re-enable it. It's also easier if you enable the Allow root logins with password option.
For Windows users, PuTTY is a popular SSH client. For Linux users, the OpenSSH client is usually already installed.
Use your SSH client to login to your OpenWrt IP on port 22, using root for the username and whatever your OpenWrt password is for the password.
Next, create a fixdns.sh script in /etc/openvpn/ by copying the following commands then pasting them into the SSH terminal:
cat > /etc/openvpn/fixdns.sh << 'EOF'
#!/bin/sh
VPNRESOLV="/tmp/resolv.conf.vpn"
CURRESOLV="/tmp/resolv.conf.auto"
BKPRESOLV="/tmp/resolv.conf.bkp"
if [ "$script_type" = "up" ]; then
echo $foreign_option_1 | grep DNS | sed -e 's/dhcp-option DNS/nameserver/g' >"$VPNRESOLV"
CURRENT_DNS=$(cat "$CURRESOLV" | grep "nameserver" | cut -d" " -f2)
NEW_DNS=$(cat "$VPNRESOLV" | grep "nameserver" | cut -d" " -f2)
if [ "$NEW_DNS" != "$CURRENT_DNS" ]; then
if [ ! -z "$NEW_DNS" ]; then
mv "$CURRESOLV" "$BKPRESOLV"
mv "$VPNRESOLV" "$CURRESOLV"
/etc/init.d/dnsmasq restart
fi
fi
fi
if [ "$script_type" = "down" ]; then
CURRENT_DNS=$(cat "$CURRESOLV" | grep "nameserver" | cut -d" " -f2)
OLD_DNS=$(cat "$BKPRESOLV" | grep "nameserver" | cut -d" " -f2)
if [ "$OLD_DNS" != "$CURRENT_DNS" ]; then
if [ ! -z "$OLD_DNS" ]; then
if [ -e "$BKPRESOLV" ]; then
mv "$BKPRESOLV" "$CURRESOLV"
rm -f "$VPNRESOLV"
/etc/init.d/dnsmasq restart
fi
fi
fi
fi
exit 0
EOF
chmod +x /etc/openvpn/fixdns.sh
Next, navigate back to VPN → OpenVPN, then click the Edit button for CSVPN.
On the next page, in the section at the top, add the following lines to the top of the config:
script-security 2 up /etc/openvpn/fixdns.sh down /etc/openvpn/fixdns.sh
The config should look something like this:
And yes, this could have been done earlier when you were adding your cryptostorm token and changing that auth-user-pass line, but I thought it would be better to keep this step separate for the users who are doing something different with their DNS.
Anyways, click the green Save button at the bottom.
Finally, navigate back to VPN → OpenVPN, then click the Enable checkbox for CSVPN, then the blue Save & Apply button at the bottom.
7. Connect
Click the Start button on the VPN → OpenVPN page to connect to the VPN.
That's it, you're done!
But just to verify that everything's working correctly, you should visit cryptostorm.is/test from a computer connected to this router to make sure it's showing the VPN's IP. You should also use dnsleaktest.com to make sure DNS isn't leaking.
WireGuard
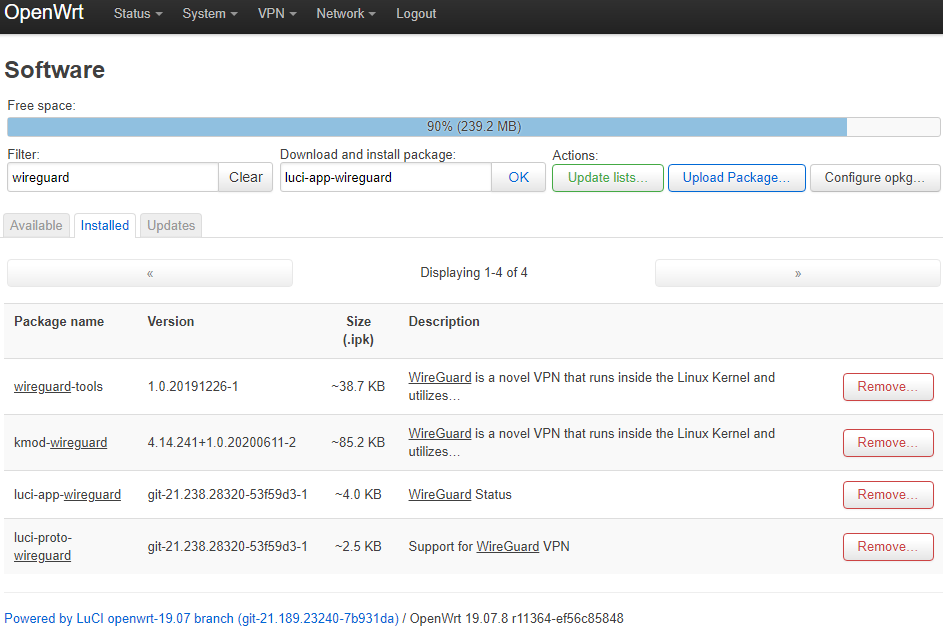
1. Install WireGuard
Login to LuCI (the web interface on your router), which by default is at http://192.168.1.1/
Navigate to System → Software then click on Update lists...
Under Download and install package, type in luci-app-wireguard then press the OK button, then Install on the confirmation window.
The official OpenWrt Wiki says that you also need luci-proto-wireguard, but in our test it was included with luci-app-wireguard.
2. Generate keys
First, connect to the SSH server OpenWrt is running. If you've disabled it, go to System → Administration → SSH Access and re-enable it. It's also easier if you enable the Allow root logins with password option.
For Windows users, PuTTY is a popular SSH client. For Linux users, the OpenSSH client is usually already installed.
Use your SSH client to login to your OpenWrt IP on port 22, using root for the username and whatever your OpenWrt password is for the password.
At that prompt, type in the command:
wg genkey | tee privatekey | wg pubkey > publickey
That'll generate your WireGuard private key and save it to the file privatekey, and your WireGuard public key to the file publickey, both in /root/
To view your private key, run the command:
cat privatekey
and to view your public key, run:
cat publickey
They both should look something like:

You'll need both in the next two steps, so save them somewhere or just keep that SSH window open.
3. Authorize keys
Go to cryptostorm.is/wireguard and paste in your cryptostorm access token in the box on the left, then in the field under that paste in your
public key that you generated in the previous step, then click the ADD KEY button.
The page should show a green Peer successfully added, followed by your public key, your preshared key, and a 10.10.x.x IP. You'll need the preshared key and that 10.10.x.x IP for the next step, so write them down or just keep this window open too.
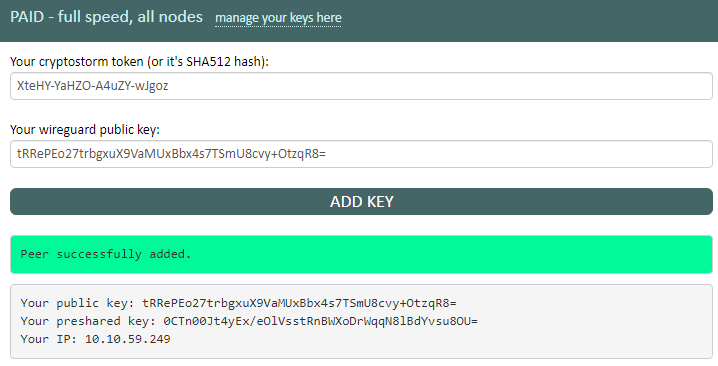
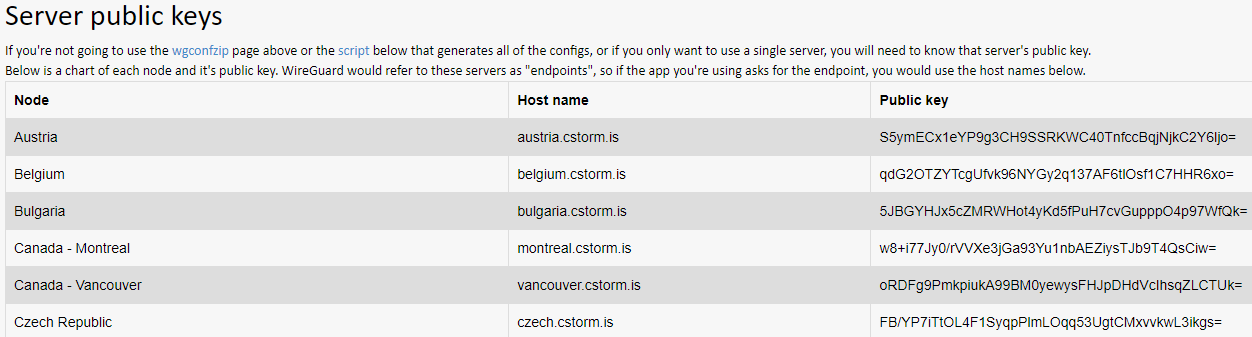
If you scroll down a bit on this page, you'll see a list of our servers and their public key. You should go ahead and pick which server you'll be using since you're already on the page.
The server's public key will also be needed in the next step.
4. Configure WireGuard
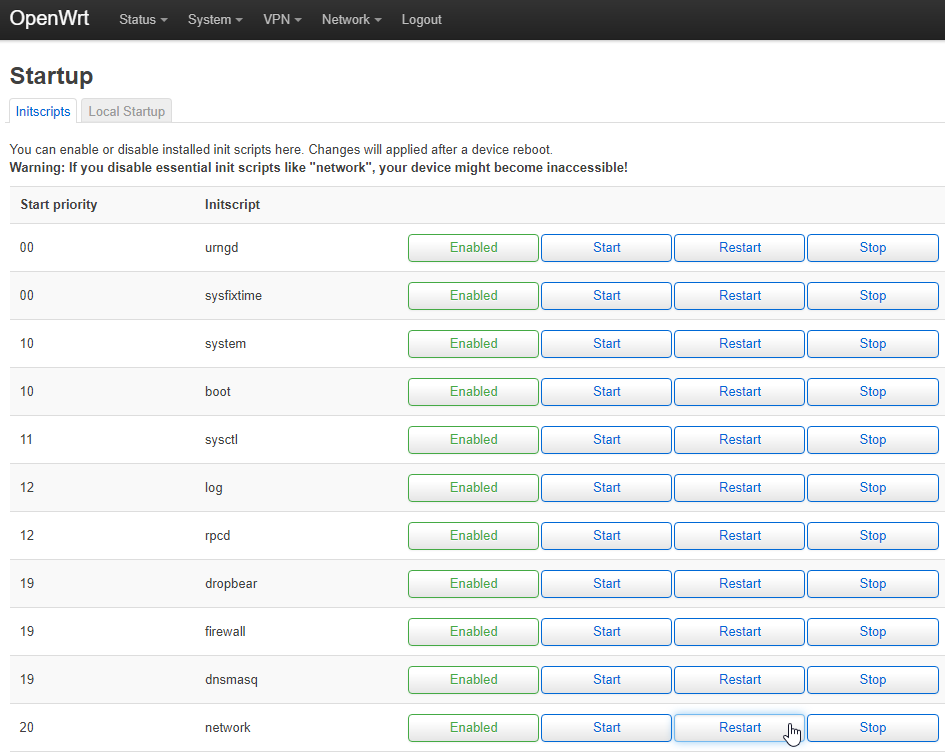
Go back to LuCI and navigate to System → Startup, then under the Initscripts tab find network, then click the Restart button to the right of it

Next, navigate to Network → Interfaces, then click the Add new interface... button
For the Name field, type in cswg. For Protocol select the new WireGuard VPN option, then click Create interface

In the next screen, under the General Settings tab, you'll paste in your private key from the step 2 into the Private Key field.
In the IP addresses field, you'll paste in that 10.10.x.x IP you got from step 3.
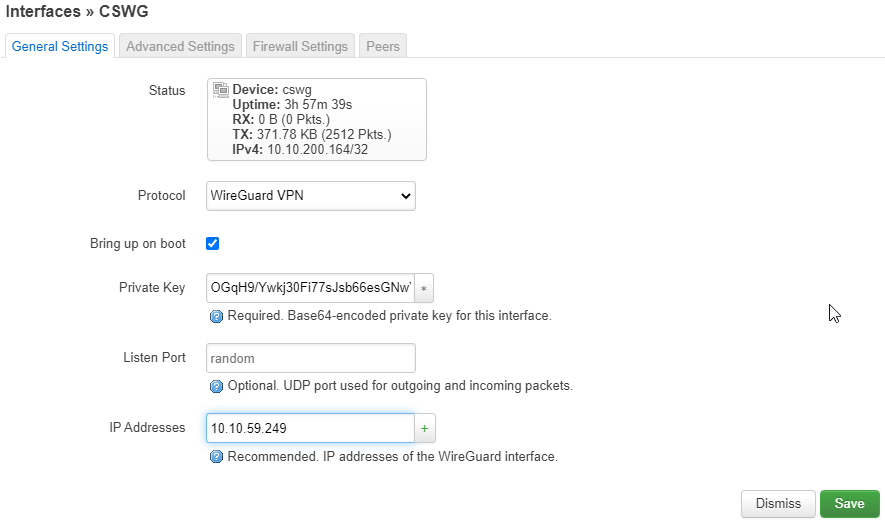
If you want your router to connect to the VPN when it boots up, select Bring up on boot
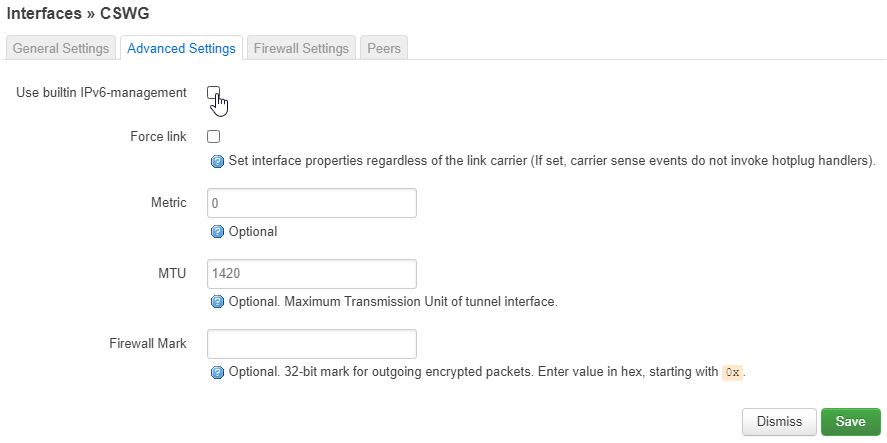
Under the Advanced Settings tab, make sure Use builtin IPv6-management is NOT selected
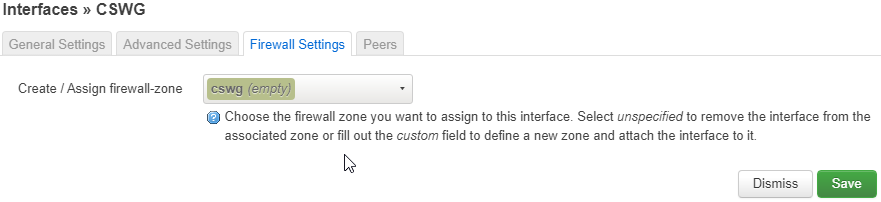
Under the Firewall Settings tab, click the drop down list and select --- custom ---, then type in cswg, then press enter.
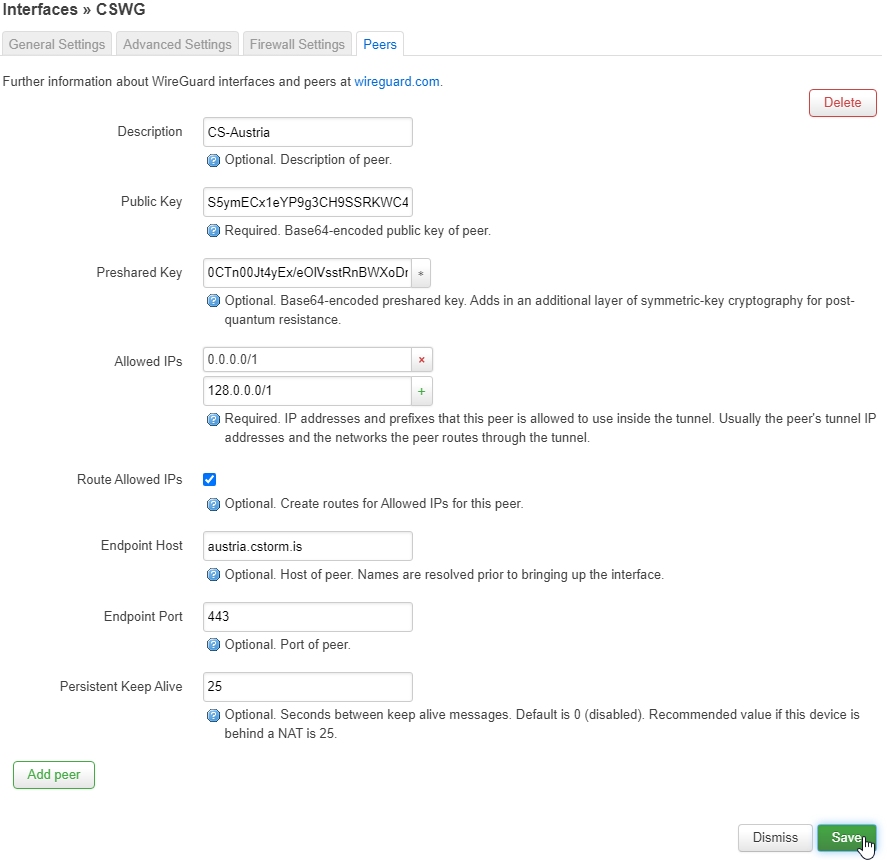
Next, click the Peers tab. Here you'll configure the server you want to connect to, which you should have already chosen from step 3. Start off by clicking the Add peer button, but make sure you only click it once.
For the Description field, enter anything that'll help you remember this peer. In this example, I'll be using our Austrian server, so I used CS-Austria.
For the Public Key field, you'll use our server's public key from cryptostorm.is/wireguard, NOT the public key you generated in step 2.
The public key for austria.cstorm.is is S5ymECx1eYP9g3CH9SSRKWC40TnfccBqjNjkC2Y6ljo= so that's what I'll use in this test.
For the Preshared Key field, you'll paste in the preshared key that cryptostorm.is/wireguard generated for you in step 3.
The Allowed IPs field should be set to 0.0.0.0/1 and 128.0.0.0/1, which you would add individually by clicking the green + button after typing in each one.
Depending on your network is setup, you might be able to use 0.0.0.0/0 instead of those two.
Route Allowed IPs should be enabled, so make sure that's checked.
Endpoint Host is the host name of the server, which is listed next to the server's public key on cryptostorm.is/wireguard. Since I'm using our Austrian server in this test, I'll use austria.cstorm.is
Endpoint Port should be set to 443, but if UDP port 443 is blocked by your firewall/ISP, you can change this to anything from 1 to 65535.
And finally, Persistent Keep Alive should be set to 25, since that's what the server-side peer uses.
When you're sure everything was input correctly, click the green Save button at the bottom left.
5. Configure Firewall
Navigate to Networking → Firewall. In the list of Zones near the bottom, click the Edit button for the cswg entry.
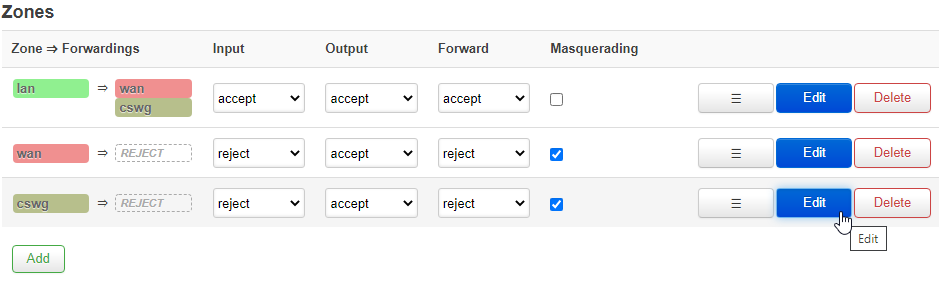
Input should be set to reject, Output to accept, Forward to reject.
Masquerading should be enabled, and so should MSS Clamping.
Covered networks should be set to cswg, and Allow forward from source zones should be set to LAN.
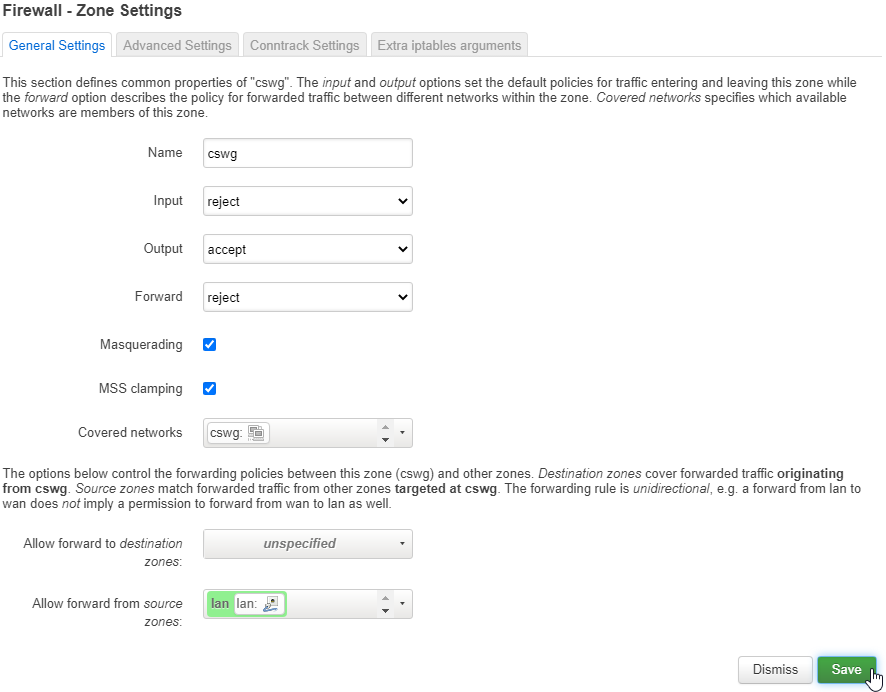
Next, click the green Save button to save these firewall settings.
6. Configure DNS
This step might not be required, depending on your specific networking setup.
If you skip this step, all DNS should still tunnel through the WireGuard interface before reaching it's destination, but it's better to use our internal DNS service instead of a third party one (like your ISP's).
The reason for that is, if a determined attacker were able to trick you somehow into resolving a host name or domain they control the DNS of, it would tell them at the very least who your ISP is (if you're your ISP's DNS).
Anyways, first, go back to LuCI and click the blue Save & Apply button if you haven't already.
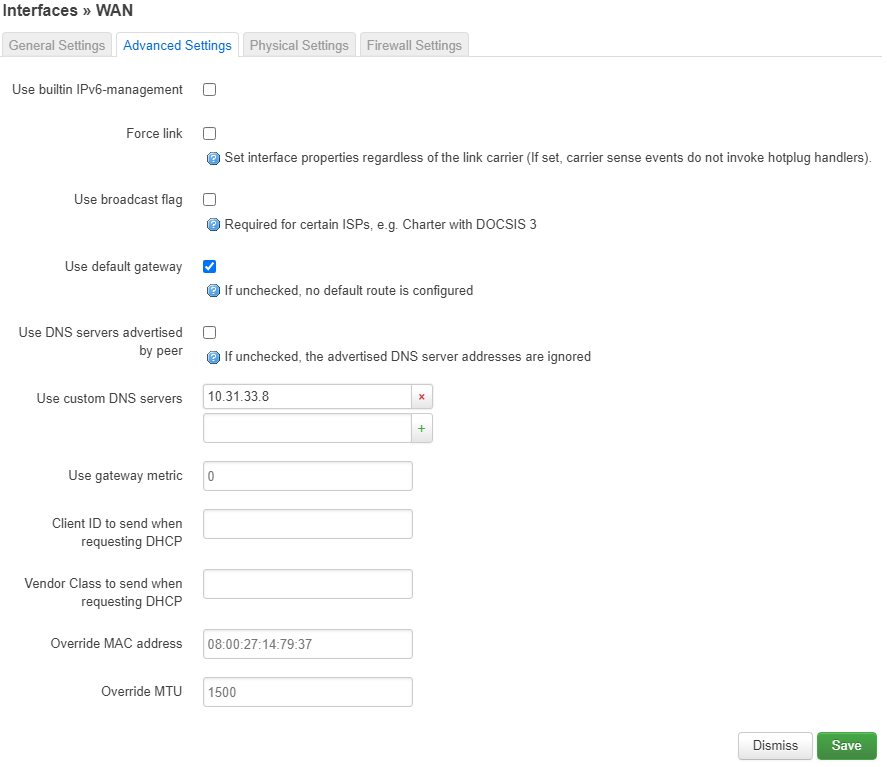
Then head back to Network → Interfaces and click the Edit button for the WAN interface.
For those of you doing a DHCP client setup, you'll want to go to the Advanced Settings tab, then uncheck the Use DNS servers advertised by peer box, then in the now visible Custom DNS servers field, type in 10.31.33.8 (or 10.31.33.7 if you want to use our ad/tracker blocking DNS server).
For people doing a Static address setup, you'll set the DNS under the General Settings tab, in the Use custom DNS servers field. Use the IP 10.31.33.8 (or 10.31.33.7 if you want to use our ad/tracker blocking DNS server).
I'm doing DHCP on my WAN interface, so mine looks like:
Keep in mind that 10.31.33.7 and 10.31.33.8 are only accessible if you're connected to the VPN. So if you decide to bring down your WireGuard interface, or you need to reboot your router, you'll need to change your DNS back to whatever it was before in order to reconnect to the VPN (or to do anything else that requires DNS).
7. Connect
If you followed the last step, you're already connected!
If you didn't, just click the blue Save & Apply button and it should apply all of the changes you made in the previous steps, and it'll bring up the WireGuard interface.
Be sure to check with dnsleaktest.com to make sure your real IP isn't showing up, and while you're there click the Standard test button just to make sure no DNS is leaking.